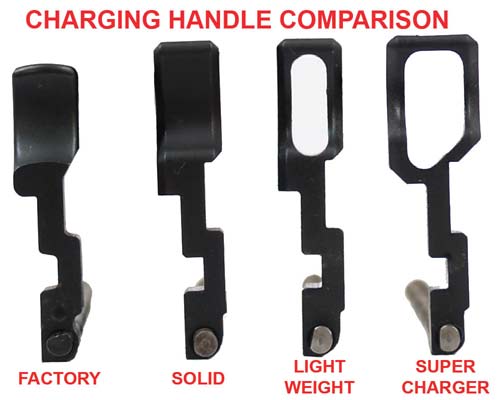


SUPER CHARGING HANDLE™ 3 PIECE CNC MACHINED ASSEMBLY FOR RUGER® 10/22® & CHARGER™
Don't confuse this CNC precision machined skelatonized lightweight SUPER
CHARGING HANDLE with lower quality plastic slip-on charging handles or
charging handles that are made with a bolt added to the side etc.
This CNC precision machined SUPER CHARGING HANDLE ASSEMBLY is machined to exacting
tolerances for a perfect drop in replacement fit in place of the
standard factory cast steel charging handle. The precision MACHINED STEEL Lightweight SUPER CHARGING HANDLE ASSEMBLY provides a non-slip grip and easy access even in cold weather with gloves on. The SUPER CHARGING HANDLE ASSEMBLY is skelatonized for maximum strength with minimum weight and is a high quality addition to any 10/22 or compatible firearm.
The SUPER CHARGING HANDLE comes complete with a precision CNC machined STAINLESS STEEL GUIDE ROD and a TARGET RECOIL SPRING and is available in your choice of either:
(1) a C-CLIPPED ROD ASSEMBLY CONFIGURATION or
(2) a CRIMPED ROD ASSEMBLY CONFIGURATION.
Although both function identically, the C-Clipped Rod Assembly allows you to disassemble the charging handle assembly for cleaning or to substitute alternate recoil springs.
The Crimped Rod Assembly, which is assembled identically to the Ruger factory assembly, CAN NOT be disassembled.
The SUPER CHARGING HANDLE is quick and easy to install with no gunsmithing required. You get the assembly of all 3 pieces for one low price!


|
Overall Rating: 5 out of 5 13 reviews
Frequently Asked Questions For
SUPER CHARGING HANDLE™
3 PIECE CNC MACHINED ASSEMBLY
FOR RUGER® 10/22® & CHARGER™
| SUPER CHARGING HANDLE 3 PIECE CNC MACHINED ASSEMBLY FOR RUGER® 10/22® & CHARGER™ |
Installation is quick and easy. No tools are required other than what you would normally need to disassemble your firearm for cleaning.
1. Ensure that your rifle is not loaded. Remove magazine. Retract bolt and visually verify that the chamber is emply.
2. Following the rifle manufacturer's instructions, remove the receiver from the stock.
3. Remove the 2 cross pins to enable the trigger housing assembly to be removed from the receiver.
4. Remove either the steel pin or the recoil buffer, whichever is installed.
5. Following the rifle manufacturer's instructions, retract the bolt and remove the bolt from the receiver.
6. Remove the factory charging handle / recoil rod & spring assembly.
7. Assemble in the reverse sequence ensuring that the end of the recoil rod is securely in the retaining pocket of the receiver.
8. After assembly, manually retract the bolt using the SUPER CHARGING HANDLE to verify fit and function prior to firing.
Installation is complete and ready for use.
 This product can expose you to chemicals including lead, which are known to the State of California to cause cancer and birth defects or other reproductive harm. For more information go to www.P65Warnings.ca.gov.